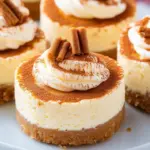
These no-bake Mini Biscoff Cheesecakes are a dream come true for cookie butter lovers. With a crunchy Biscoff cookie crust, a rich and creamy Biscoff cheesecake filling, and a drizzle of melted cookie butter, each bite is pure indulgence. They are easy to make, require no oven time, and are perfect for parties, gatherings, or an everyday treat.

Why You’ll Love This Recipe
- No-Bake and Easy to Make – No need for an oven, making it a stress-free dessert.
- Perfectly Creamy and Crunchy – A smooth, rich filling paired with a crisp cookie crust.
- Bite-Sized and Portable – Great for parties, potlucks, or as a personal treat.
- Packed with Biscoff Flavor – Made with both Biscoff cookies and cookie butter for the ultimate flavor boost.
Preparation Phase & Tools to Use
Essential Tools and Equipment
Having the right tools will make preparation smoother and ensure the best results.
- Mini Cheesecake Pan – Ideal for creating individual cheesecakes. If unavailable, use a muffin tin with cupcake liners.
- Electric Mixer – Helps create a smooth and airy cheesecake filling.
- Mixing Bowls – Needed for preparing the crust, filling, and whipped cream.
- Spatula – Useful for folding and scraping down the sides of the bowl.
- Piping Bags – For neatly filling the cheesecake cups and decorating.
- Measuring Cups and Spoons – Ensures precise ingredient measurements.
Ingredient Breakdown and Their Role
Understanding the role of each ingredient ensures the best texture and flavor.
- Biscoff Cookies – Used for the crust and garnish, adding a rich caramelized crunch.
- Granulated Sugar – Sweetens the crust and helps bind it.
- Salted Butter – Adds moisture to the crust, keeping it firm.
- Cream Cheese – Forms the base of the cheesecake filling, making it smooth and rich.
- Powdered Sugar – Sweetens the filling and whipped cream without making them grainy.
- Biscoff Spread (Cookie Butter) – Infuses deep Biscoff flavor into the cheesecake.
- Vanilla Extract – Enhances the overall flavor.
- Heavy Cream – Adds lightness and fluffiness to the cheesecake filling and whipped cream.
Step-by-Step Directions
1. Make the Biscoff Cookie Crust
- Crush Biscoff cookies into fine crumbs using a food processor or by placing them in a sealed bag and crushing with a rolling pin.
- In a mixing bowl, combine the cookie crumbs, granulated sugar, and melted butter. Stir until the mixture resembles wet sand.
- Spoon about 1 tablespoon of the mixture into each cup of a mini cheesecake pan.
- Press the crumbs down firmly using the back of a spoon or a flat-bottomed glass.
- Set aside while preparing the filling.
2. Prepare the Cheesecake Filling
- In a large bowl, beat the cream cheese, powdered sugar, Biscoff spread, and vanilla extract with an electric mixer until smooth.
- Pour in the heavy cream and continue mixing on medium-high speed until the mixture thickens and becomes light and fluffy.
- Transfer the filling to a piping bag for easy assembly.
3. Assemble and Chill
- Pipe the cheesecake mixture over the prepared crusts, filling each cup slightly above the rim.
- Smooth the tops with a spatula or the back of a spoon.
- Refrigerate for at least 12 hours or overnight to allow the cheesecakes to set completely.
- Once set, carefully remove the cheesecakes from the pan.
4. Make the Whipped Cream
- In a clean mixing bowl, whip heavy cream, powdered sugar, and vanilla extract until medium-stiff peaks form.
- Transfer the whipped cream to a piping bag fitted with a Wilton 1M tip for a decorative touch.
5. Decorate and Serve
- Melt Biscoff spread in the microwave for 30 seconds, stirring until smooth.
- Drizzle the melted spread over each cheesecake.
- Pipe a small swirl of whipped cream on top.
- Sprinkle with Biscoff cookie crumbs and garnish each cheesecake with half of a Biscoff cookie.
Notes and Tips
- Chill Time is Key – The cheesecakes need at least 12 hours to set properly. Do not rush this step.
- No Mini Cheesecake Pan? – Use a muffin tin with cupcake liners for easy removal.
- Storage – Keep in an airtight container in the refrigerator for up to 3 days.
- Freezing Option – Store in an airtight container and freeze for up to one month. Thaw in the refrigerator before serving.
Serving Suggestions & Presentation Tips
- Serve these cheesecakes chilled for the best texture. The creamy filling firms up beautifully in the refrigerator.
- Drizzle the melted Biscoff spread just before serving for a glossy and fresh look.
- Use a piping bag with a decorative tip to swirl the whipped cream for a polished presentation.
- Sprinkle extra cookie crumbs on top for added crunch and visual appeal.
- Garnish each cheesecake with half a Biscoff cookie to enhance the look and highlight the key ingredient.
Common Mistakes and How to Avoid Them
- Overmixing the Cheesecake Filling
- Overmixing can cause the filling to become dense instead of light and fluffy. Mix just until everything is well combined.
- Not Chilling Long Enough
- Mini cheesecakes need at least 12 hours in the refrigerator to fully set. Rushing this step may result in a soft or runny texture.
- Using Warm Ingredients Instead of Room Temperature
- Cold cream cheese can create lumps in the filling. Let it sit at room temperature for at least 30 minutes before mixing.
- Pressing the Crust Too Hard or Too Loose
- If pressed too hard, the crust may be too firm and difficult to eat. If too loose, it may crumble. Press just firmly enough to hold together.
- Miscalculating the Right Amount of Biscoff Spread
- Too much Biscoff spread in the filling can make it overly dense. Stick to the recipe measurements for the best balance.
- Skipping the Muffin Liners If Using a Muffin Tin
- If you don’t have a mini cheesecake pan, using a muffin tin with liners helps with easy removal. Otherwise, the cheesecakes may stick.
Perfect Pairings: What to Serve With Mini Biscoff Cheesecakes
Pairing these cheesecakes with complementary flavors can elevate the dessert experience.
- Coffee & Espresso Drinks – The bold flavors of coffee enhance the caramelized spiced notes of Biscoff.
- Vanilla Ice Cream – A scoop of vanilla ice cream adds a creamy contrast.
- Caramel Sauce Drizzle – A light caramel drizzle complements the cookie butter flavor.
- Chopped Nuts (Almonds, Pecans, Walnuts) – Adds texture and a nutty depth.
- Chocolate Ganache – A layer of chocolate ganache on top makes for a decadent variation.
- Fresh Berries (Strawberries, Raspberries, Blueberries) – The tartness of fresh berries balances the sweetness.
- Whipped Coffee (Dalgona Coffee) – A trendy pairing with its bold coffee flavor.
- Milkshakes – Serve alongside a vanilla or Biscoff-flavored milkshake for a double dessert experience.
Recipe Tips for the Best Mini Biscoff Cheesecakes
- Use Room Temperature Ingredients
- Let the cream cheese sit at room temperature for at least 30 minutes before mixing. This ensures a smooth and lump-free cheesecake filling.
- Chill the Heavy Cream Before Whipping
- Cold heavy cream whips better and holds its structure longer. For the best results, place the mixing bowl and beaters in the freezer for 10 minutes before whipping.
- Do Not Overmix the Filling
- Overmixing can incorporate too much air, making the cheesecake too soft. Mix until just combined and smooth.
- Use a Piping Bag for Neat Assembly
- Piping the cheesecake filling into the crust helps create an even and polished look, making it easier to portion.
- Refrigerate Overnight for Best Texture
- Although the cheesecakes may seem firm after a few hours, overnight chilling allows the flavors to develop fully and ensures a perfect texture.
- Drizzle Melted Biscoff Spread Just Before Serving
- Heating the Biscoff spread for about 30 seconds in the microwave makes it easier to drizzle. Pour it over the cheesecakes right before serving for a fresh and glossy finish.
- Experiment with Different Toppings
- Try adding chocolate shavings, caramel drizzle, or crushed nuts to customize the flavor and presentation.
Storage and Reheating Instructions
- Refrigerator Storage
- Store mini Biscoff cheesecakes in an airtight container in the refrigerator for up to three days. Keep them chilled until ready to serve.
- Freezing Option
- To freeze, place the cheesecakes on a tray and freeze for about an hour until firm. Transfer them to an airtight container or freezer bag, separating layers with parchment paper. They can be frozen for up to one month.
- Thawing Instructions
- When ready to serve, transfer the cheesecakes to the refrigerator and let them thaw overnight. Avoid thawing at room temperature, as this can cause them to become too soft.
- Serving After Storage
- If the cheesecakes have been refrigerated, let them sit for about 10 minutes before serving for the best texture. If frozen, allow enough time to fully thaw in the fridge before serving.
FAQs (Frequently Asked Questions)
Can I use a different cookie for the crust?
Yes, graham crackers, digestive biscuits, or even Oreos can be used instead of Biscoff cookies. However, Biscoff cookies provide the signature caramelized flavor that complements the cheesecake filling best.
Can I make these ahead of time?
Absolutely. These mini cheesecakes need at least 12 hours to chill, making them an excellent make-ahead dessert. They can be stored in the fridge for up to three days or frozen for longer storage.
Can I use store-bought whipped topping instead of homemade whipped cream?
Yes, but homemade whipped cream gives a fresher taste and better texture. If using store-bought, be sure to fold it in gently to maintain the light consistency.
What’s the best way to drizzle the melted Biscoff spread?
Microwave the spread in short intervals, stirring in between, until it reaches a pourable consistency. Use a spoon or a piping bag to drizzle it over the cheesecakes.
How can I make these cheesecakes firmer?
Ensure they are chilled for the full recommended time. If you prefer a firmer texture, add an extra tablespoon of Biscoff spread to the filling and chill for at least 24 hours.
Can I make a full-sized version instead of mini cheesecakes?
Yes, this recipe can be adapted into a standard no-bake Biscoff cheesecake. Use a 9-inch springform pan and chill for at least 12 hours before slicing.
Conclusion and Final Thoughts
Mini Biscoff cheesecakes are an easy, no-bake dessert that delivers rich cookie butter flavor in every bite. Their creamy texture, crunchy crust, and irresistible toppings make them a perfect treat for any occasion.
These cheesecakes are great for parties, family gatherings, or simply as a sweet indulgence. The recipe is flexible, allowing for variations in toppings and crust choices. Whether you enjoy them as-is or with a drizzle of chocolate or caramel, they are sure to impress.
Making these cheesecakes ahead of time makes serving effortless. With proper storage, they maintain their texture and flavor for days.
Try this recipe and enjoy the creamy, spiced goodness of Biscoff in a bite-sized dessert.
Mini Biscoff Cheesecakes
Ingredients
Biscoff Cookie Crust:
- 2 cups Biscoff cookie crumbs
- 2 tablespoons granulated sugar
- 6 tablespoons salted butter melted
Biscoff Cheesecake Filling:
- 16 oz cream cheese room temperature
- 1 ¾ cups powdered sugar
- 1 cup Biscoff spread cookie butter
- 2 teaspoons vanilla extract
- 1 cup heavy cream
Whipped Cream:
- ¾ cup heavy cream
- 2 tablespoons powdered sugar
- ½ teaspoon vanilla extract
Additional Toppings:
- ¾ cup Biscoff spread cookie butter, melted
- 2 tablespoons Biscoff cookie crumbs
- 12 Biscoff cookies halved
Instructions
Make the Biscoff Cookie Crust
- In a mixing bowl, stir together the Biscoff cookie crumbs, granulated sugar, and melted butter until well combined.
- Portion about 1 tablespoon of the mixture into each cup of a mini cheesecake pan.
- Firmly press the crumbs down to form the crust. Set aside.
Prepare the Cheesecake Filling
- In a large bowl, use an electric mixer to beat together the cream cheese, powdered sugar, Biscoff spread, and vanilla extract until smooth.
- Pour in the heavy cream and whip the mixture on medium-high speed until it thickens and becomes light and fluffy.
Assemble and Chill
- Fill a piping bag with the cheesecake mixture and pipe it onto the prepared crusts, slightly above the top of the pan.
- Refrigerate for at least 12 hours or overnight until fully set.
- After chilling, carefully remove the cheesecakes from the pan.
Make the Whipped Cream
- In a bowl, whip the heavy cream, powdered sugar, and vanilla extract until medium-stiff peaks form.
- Transfer to a piping bag fitted with a Wilton 1M piping tip.
Decorate and Serve
- Melt the Biscoff spread in the microwave for about 30 seconds, then drizzle over the cheesecakes.
- Pipe a small swirl of whipped cream on top.
- Sprinkle with Biscoff cookie crumbs and garnish each cheesecake with half of a Biscoff cookie.


Leave a Comment