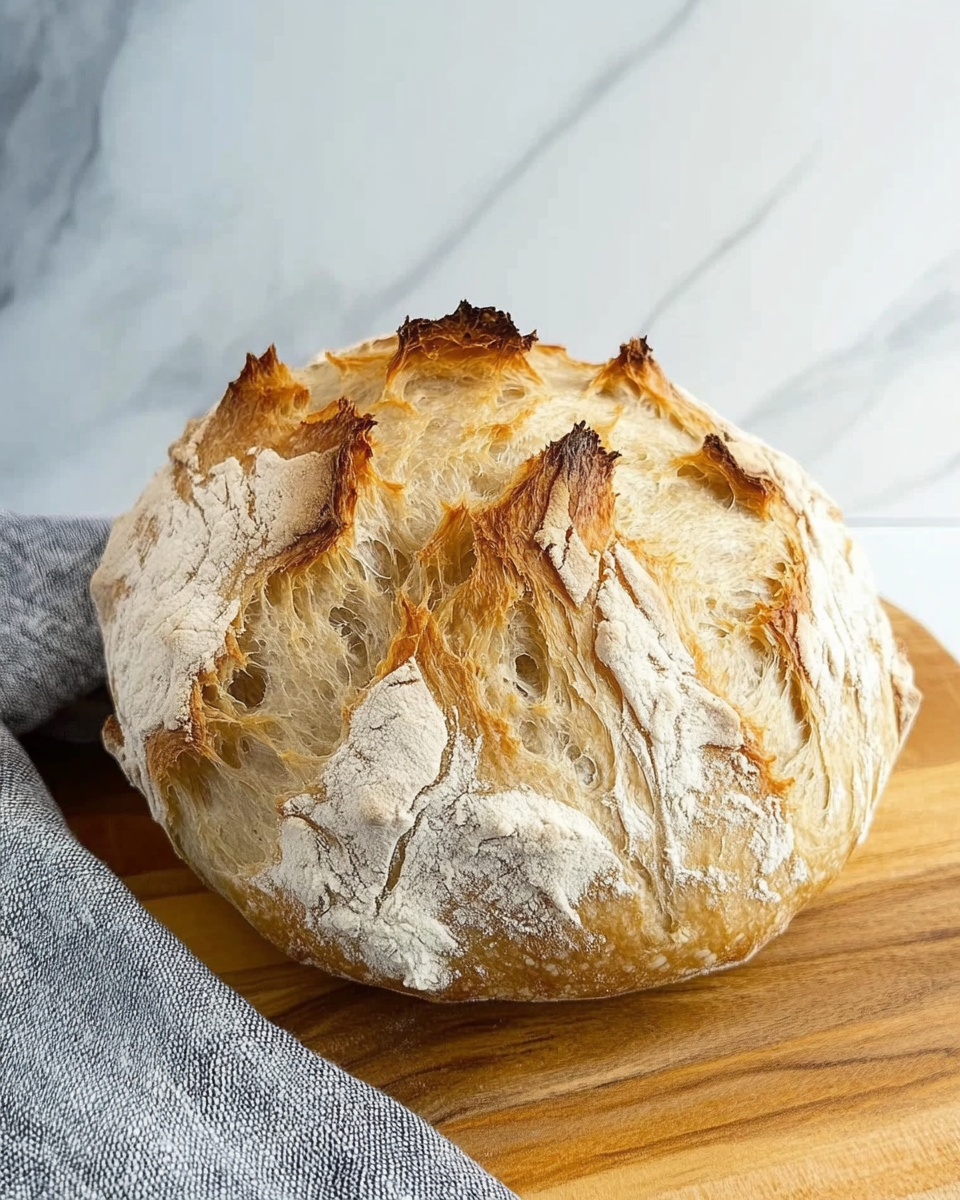
This Quick and Easy No-Knead Bread is a game-changer for anyone who loves homemade bread but doesn’t want to deal with kneading or complicated techniques. With just four simple ingredients and minimal hands-on time, you can achieve a crusty, bakery-style loaf right in your own kitchen. Whether you’re a beginner or an experienced baker, this no-knead method simplifies the bread-making process while delivering incredible flavor and texture.
Why You’ll Love This Recipe
- No kneading required – Let time and yeast do the work.
- Minimal ingredients – Just flour, yeast, salt, and water.
- Crusty, chewy texture – Achieves a professional-style crust with a soft interior.
- Beginner-friendly – No need for special techniques or equipment beyond a Dutch oven.
- Versatile – Customize with herbs, seeds, or cheese for extra flavor.
Preparation Phase & Tools to Use
While this recipe is simple, a few key tools and preparation steps will ensure success.
Essential Tools and Equipment
- Large mixing bowl – To mix and let the dough rise.
- Wooden spoon or spatula – For easy stirring without overworking the dough.
- Dutch oven with lid – Retains steam while baking, creating a crisp crust.
- Parchment paper – Helps transfer the dough and prevents sticking.
- Flour for dusting – Prevents the dough from sticking to your hands and surfaces.
- Dough scraper (optional) – Helps shape and move the sticky dough.
Preparation Tips
- Use warm water (110°F/43°C) – This activates the yeast properly.
- Avoid overmixing – Stir just until the dough comes together; lumps are fine.
- Let it rise in a warm, draft-free place – This encourages proper fermentation.
- Preheat the Dutch oven – A hot baking surface ensures an instant rise and crispy crust.
- Handle the dough gently – Overworking can deflate the air bubbles, affecting texture.
Ingredients
- 3 cups bread flour – Provides structure and chewiness.
- 1 packet (2 teaspoons) rapid rise yeast – Speeds up the rise time.
- 1 ½ teaspoons salt – Enhances flavor.
- 1 ½ cups warm water (110°F/43°C) – Activates the yeast and forms the dough.
Step-by-Step Directions
1. Mix the Dough
- In a large mixing bowl, combine the flour, yeast, and salt.
- Pour in the warm water and stir with a wooden spoon or spatula until a sticky, shaggy dough forms. It will be messy but don’t worry—that’s normal.
2. Let the Dough Rise
- Cover the bowl with a damp cloth or plastic wrap.
- Let it rest in a warm, draft-free place for 2-3 hours, or until it doubles in size.
3. Preheat the Oven and Dutch Oven
- About 30 minutes before baking, preheat your oven to 450°F (232°C).
- Place your Dutch oven (with lid on) inside the oven to heat up.
4. Shape the Dough
- Lightly flour your work surface and hands.
- Gently turn out the dough onto the floured surface.
- Fold the sides of the dough inward 5-6 times to form a rough ball.
- Avoid pressing too hard to preserve the air bubbles.
5. Transfer to Parchment Paper
- Place the dough onto a large piece of parchment paper.
- Leave enough overhang to easily lift the dough later.
6. Bake the Bread
- Carefully remove the hot Dutch oven from the oven.
- Using the parchment paper, transfer the dough into the Dutch oven.
- Cover with the lid and bake for 30 minutes.
- After 30 minutes, remove the lid and bake for 15 more minutes, or until the crust is golden brown.
7. Cool and Serve
- Lift the bread out using the parchment paper and place it on a wire rack.
- Let it cool completely before slicing to allow the texture to set.
Notes & Variations
- Sticky dough is normal – Don’t add too much extra flour.
- Be careful with the Dutch oven – It will be extremely hot.
- Customize the flavor – Try mixing in garlic powder, shredded cheese, or dried
Best Ways to Serve No-Knead Bread
This crusty bread is delicious on its own, but it pairs exceptionally well with a variety of dishes. Here are some great ways to enjoy it:
1. With Soups and Stews
The chewy texture and crispy crust make it ideal for dipping. Try it with:
- Tomato soup – A classic comfort meal.
- Beef stew – Perfect for soaking up the rich broth.
- Chicken noodle soup – Adds a hearty touch to a light meal.
- Lentil soup – Complements the earthy flavors.
2. As a Sandwich Bread
Although this bread has a rustic shape, it works well for sandwiches. Slice it thick for:
- Grilled cheese – The crispy crust pairs beautifully with melted cheese.
- Turkey and avocado sandwich – A great option for a fresh and filling lunch.
- Bruschetta – Top with diced tomatoes, basil, and olive oil for a simple appetizer.
3. Toasted with Toppings
Toasting enhances the crispness and flavor. Try topping it with:
- Butter and honey – A simple, sweet treat.
- Avocado and sea salt – A nutritious breakfast option.
- Garlic butter – Perfect as a side for pasta dishes.
- Ricotta and berries – A light and creamy topping for a snack or breakfast.
4. Paired with Cheese and Charcuterie
This bread works wonderfully for cheese boards and appetizers. It pairs well with:
- Brie or camembert – The mild, creamy texture contrasts with the crispy crust.
- Sharp cheddar – Adds a bold, tangy bite.
- Prosciutto or salami – Complements the rich flavors of cured meats.
5. For Breakfast
This bread isn’t just for dinner—it makes a great morning meal too:
- French toast – The sturdy structure holds up well when soaked in egg.
- Egg and cheese sandwich – A hearty and filling breakfast option.
- Butter and jam – A simple but delicious way to start the day.
Common Mistakes and How to Fix Them
While this bread is simple to make, a few common mistakes can affect the final outcome. Here’s how to avoid them:
1. Using Water That’s Too Hot or Too Cold
- Mistake: If the water is too hot, it can kill the yeast. If it’s too cold, the yeast won’t activate properly.
- Fix: Use water between 105°F and 110°F (40°C to 43°C) for best results.
2. Adding Too Much Flour
- Mistake: Since the dough is sticky, some people add extra flour, making the bread dense.
- Fix: Trust the recipe and resist the urge to add more flour. The dough should be soft and sticky.
3. Not Letting the Dough Rise Long Enough
- Mistake: If the dough doesn’t rise fully, the bread will be too dense.
- Fix: Let the dough rise until it doubles in size, which usually takes 2-3 hours. If your kitchen is cold, place the bowl inside a turned-off oven with the light on to create a warm environment.
4. Skipping the Dutch Oven Preheat
- Mistake: A cold Dutch oven won’t create the steam needed for a crisp crust.
- Fix: Always preheat the Dutch oven for at least 30 minutes before adding the dough.
5. Removing the Lid Too Early
- Mistake: If you take the lid off too soon, the bread may not rise properly.
- Fix: Keep the lid on for the first 30 minutes to allow steam to create the perfect crust, then remove it for the final 15 minutes to develop a golden color.
6. Slicing the Bread Too Soon
- Mistake: Cutting into hot bread can make it gummy inside.
- Fix: Let the bread cool completely for at least 30 minutes before slicing. This allows the interior to set properly.
Side Dishes That Pair Well with No-Knead Bread
If you’re serving this bread with a meal, here are eight delicious side dish ideas:
1. Roasted Tomato Soup
A creamy and rich soup that pairs perfectly with crispy, buttered slices of bread.
2. Garlic Butter Shrimp
The bread soaks up the buttery, garlicky sauce for a simple yet satisfying meal.
3. Classic Caesar Salad
A light and crisp salad with Parmesan cheese and tangy dressing balances the hearty bread.
4. Baked Brie with Honey
Warm, gooey cheese served with fresh bread makes an elegant appetizer.
5. Creamy Mushroom Pasta
The rustic texture of the bread pairs well with a creamy, umami-rich pasta dish.
6. Shakshuka
This spiced tomato and poached egg dish is perfect for dipping bread into the sauce.
7. Beef Stroganoff
The bread can be used to mop up the creamy mushroom and beef sauce.
8. Hummus and Baba Ganoush
Light, healthy dips that complement the chewy texture of the bread.
Expert Tips for Perfect No-Knead Bread
1. Use Bread Flour for Better Texture
Bread flour has a higher protein content than all-purpose flour, which helps create a chewy texture and a better rise. If you only have all-purpose flour, you can still make this recipe, but the texture may be slightly softer.
2. Let the Dough Ferment Longer for More Flavor
If you have extra time, let the dough rest for 8-12 hours instead of the usual 2-3 hours. This slow fermentation process develops a deeper flavor and improves the bread’s texture.
3. Don’t Skip the Dutch Oven
A Dutch oven traps steam, which helps create a crisp, golden crust. If you don’t have one, place a metal baking dish filled with water on the bottom rack of your oven to create steam while baking.
4. Use a Digital Thermometer to Check Doneness
For perfect results, insert a thermometer into the center of the bread. The internal temperature should be 190°F to 200°F (88°C to 93°C) when fully baked.
5. Add Mix-Ins for Extra Flavor
This bread is a great base for different flavors. Try adding:
- Herbs and spices – Garlic powder, rosemary, thyme, or Italian seasoning.
- Cheese – Shredded cheddar, parmesan, or gruyere.
- Nuts and seeds – Sunflower seeds, sesame seeds, or chopped walnuts.
- Dried fruit – Cranberries, raisins, or chopped apricots for a sweet variation.
Storage and Reheating Instructions
Storing No-Knead Bread
To keep your bread fresh, follow these steps:
- At room temperature: Wrap the cooled bread in a clean kitchen towel and store it in a bread box or paper bag for up to 3 days. Avoid plastic bags, as they trap moisture and soften the crust.
- In the refrigerator: While not recommended (as it can dry out the bread), you can wrap it in plastic wrap and store it for up to 5 days.
- In the freezer: Slice the bread before freezing so you can take out pieces as needed. Wrap slices in plastic wrap, place them in a zip-top bag, and freeze for up to 3 months.
Reheating Instructions
- Room temperature bread: If the bread has softened, place it in a 350°F (175°C) oven for 10 minutes to restore its crispness.
- Frozen bread: Let it thaw at room temperature, then warm in the oven for 5-10 minutes at 350°F (175°C).
- Toaster method: If reheating a single slice, use a toaster or toaster oven for a crisp result.
Frequently Asked Questions
1. Can I Make This Bread Without a Dutch Oven?
Yes. If you don’t have a Dutch oven, bake the bread on a preheated baking stone or sheet pan. Place a metal baking dish filled with boiling water on the bottom rack of the oven to create steam, which helps form a crusty exterior.
2. Can I Let the Dough Rise Overnight?
Yes. For a more developed flavor, let the dough rise at room temperature for 8-12 hours. If your kitchen is warm, refrigerate the dough to slow the fermentation and prevent over-proofing.
3. What If My Dough Is Too Sticky to Handle?
No-knead dough is naturally sticky, but if it’s too wet to shape, dust your hands and work surface with a small amount of flour. Avoid adding too much, as this can make the bread dense.
4. Why Didn’t My Bread Rise?
If your bread didn’t rise properly, it could be due to:
- Old yeast – Check the expiration date before using.
- Water temperature – Water that is too hot or too cold can prevent yeast activation.
- A cold kitchen – Try placing the dough in a warm spot, such as near a stove or inside a turned-off oven with the light on.
5. Can I Use Whole Wheat Flour Instead of Bread Flour?
Yes, but whole wheat flour absorbs more liquid and can make the bread denser. To keep the texture light, use half whole wheat and half bread flour or add an extra ¼ cup of water to the recipe.
6. Can I Make This Recipe Gluten-Free?
This recipe is designed for bread flour, but you can try using a gluten-free all-purpose flour blend with xanthan gum for structure. The results may vary, as gluten-free dough doesn’t develop the same elasticity.
7. Why Is My Crust Too Hard?
If the crust is too hard or thick, try these solutions:
- Reduce baking time – Bake for 5-10 minutes less.
- Lower the oven temperature – Try baking at 425°F (218°C) instead of 450°F (232°C).
- Store the bread in a paper bag – This helps soften the crust while keeping it crisp.
8. How Do I Make the Crust Extra Crispy?
To achieve a crispier crust:
- Bake the bread for an extra 5 minutes with the lid off.
- Let the bread cool completely before slicing—this allows steam to escape, preventing a soft crust.
- Place the baked bread directly on the oven rack for the last 5 minutes of baking.
Final Thoughts
This quick and easy no-knead bread is one of the simplest ways to enjoy homemade, bakery-style bread with minimal effort. With just a few ingredients and no kneading required, it’s perfect for beginners and seasoned bakers alike. By following the storage and reheating tips, you can keep your bread fresh for days, and with the added variations, you can customize it to suit any meal.
Whether served with soup, used for sandwiches, or enjoyed on its own, this bread is sure to become a staple in your kitchen.
Quick and Easy No-Knead Bread
Ingredients
- 3 cups bread flour
- 1 packet 2 teaspoons rapid rise yeast
- 1 ½ teaspoons salt
- 1 ½ cups warm water
Instructions
Mix the Dough:
- In a large mixing bowl, combine the flour, rapid rise yeast, and salt.
- Add the warm water and mix with a wooden spoon or spatula until a sticky dough forms. Don’t worry if it looks messy—this is normal!
Let the Dough Rise:
- Cover the bowl with a damp cloth and let the dough rest in a draft-free place (like a turned-off oven) for 2-3 hours, or until it doubles in volume.
Preheat the Oven:
- A few minutes before the rising time is complete, preheat your oven to 450°F (232°C).
- Place a Dutch oven (with the lid on) in the oven to heat while it preheats.
Shape the Dough:
- Lightly sprinkle flour on your countertop and turn the dough out onto it.
- Gently fold the sides of the dough inward about 6 times to form a round loaf. If the dough sticks to your hands, dust them lightly with flour.
Transfer to Parchment Paper:
- Use a dough scraper or large knife to transfer the dough onto a piece of parchment paper.
- Leave enough parchment paper hanging over the sides to help lift the bread later.
Bake the Bread:
- Carefully remove the Dutch oven from the oven (it will be very hot!).
- Using the parchment paper, transfer the dough into the Dutch oven. Place the lid on the Dutch oven.
- Bake for 30 minutes with the lid on.
- After 30 minutes, remove the lid and bake for an additional 15 minutes, or until the bread is golden brown.
Cool and Serve:
- Remove the bread from the Dutch oven using the parchment paper and let it cool on a wire rack before slicing.


Leave a Comment