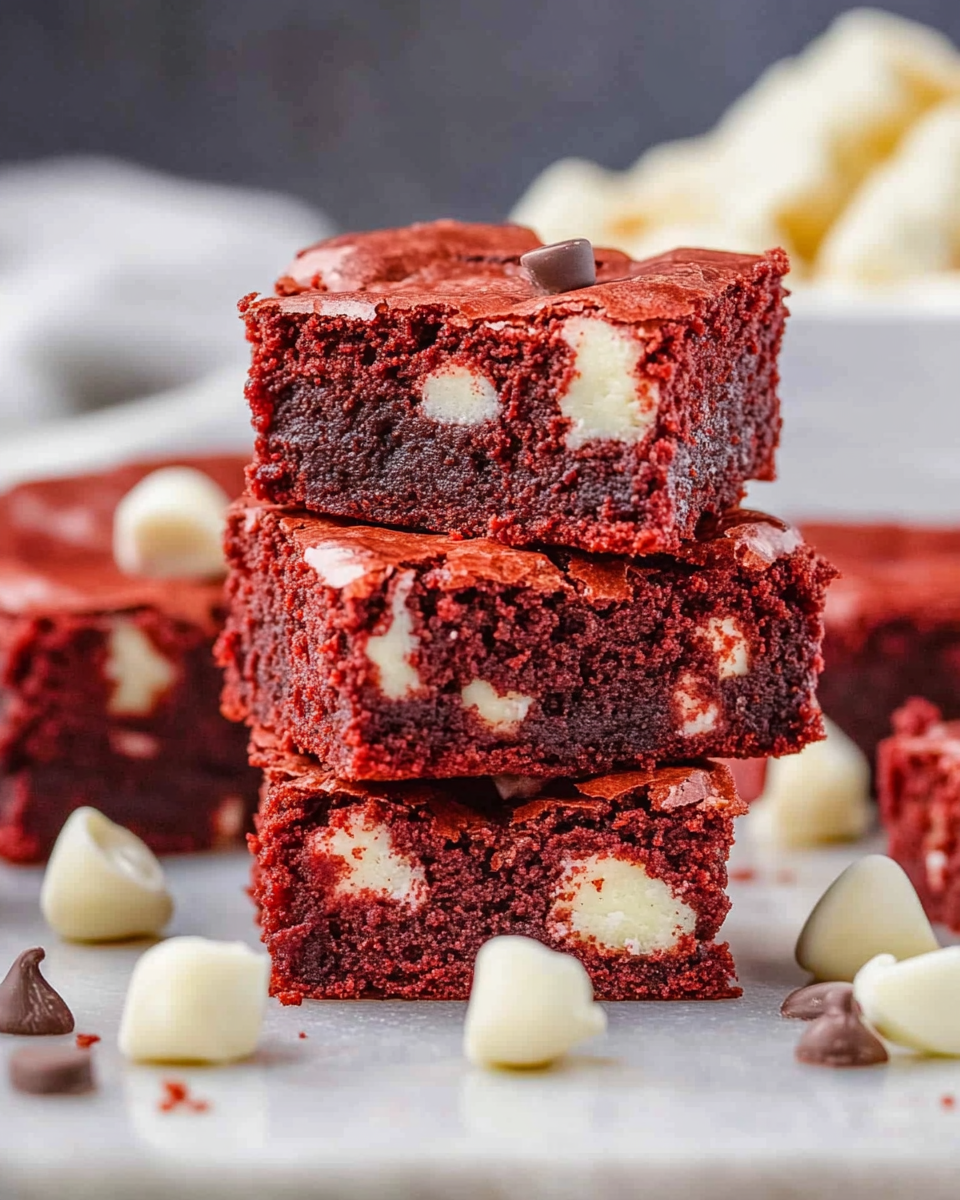
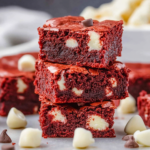
Red velvet brownies offer a unique twist on traditional brownies by combining a rich cocoa flavor with a vibrant red hue. These decadent treats attract dessert lovers who seek both aesthetics and taste. The balanced flavor profile and soft, moist texture ensure these brownies satisfy cravings on special occasions or casual evenings. With bursts of white chocolate chips, they provide a delightful contrast that keeps you coming back for more. Home bakers appreciate this recipe because it uses simple ingredients and straightforward methods that yield professional-quality results. Whether you serve them at holiday parties, dinner events, or as an everyday indulgence, these red velvet brownies promise to be a crowd-pleaser.
Why You’ll Love This Recipe
- Unique Appearance: The dramatic red color makes these brownies stand out.
- Decadent Taste: The subtle cocoa flavor pairs perfectly with creamy white chocolate chips.
- Versatile Appeal: They work as a dessert centerpiece or an afternoon treat.
- Ease of Preparation: Simple techniques and common ingredients make this recipe ideal for both experienced bakers and beginners.
Preparation Phase
Start by organizing your work area and measuring all ingredients accurately. This ensures consistency in texture and flavor. Allow butter and eggs to reach room temperature to help the batter mix uniformly. Read through the entire recipe before you begin. Doing so sets a clear roadmap and reduces the chance of mistakes. For further guidance on effective preparation, check out Food Network’s baking tips.
Essential Tools and Equipment
- 9×9-inch Baking Pan: Provides even heat distribution for consistent baking.
- Mixing Bowls: Use a large bowl for the main mixture and smaller bowls for pre-measured ingredients.
- Whisk and Rubber Spatula: A whisk ensures smooth mixing of wet ingredients, while a spatula helps fold in dry ingredients gently.
- Parchment Paper: Facilitates easy removal of the brownies and ensures clean slicing.
- Oven Thermometer: Confirms your oven’s temperature accuracy to prevent overbaking.
- Toothpick Tester: Verifies that the brownies are perfectly baked with moist crumbs.
Each tool plays a vital role. The 9×9-inch pan and parchment paper work together to produce brownies with a desirable edge and center. The whisk and spatula guarantee that your mixture stays smooth and uniform, preventing lumps and ensuring even distribution of the vibrant red color. A reliable oven thermometer protects against fluctuating temperatures that could affect texture and moisture.
Preparation Tips
- Sift Dry Ingredients: This helps create a light, even batter.
- Avoid Overmixing: Mix just until the flour is incorporated to maintain a soft texture.
- Gradual Food Coloring Addition: Start with a few drops and gradually add more until you reach the desired intensity.
- Measure Accurately: Each component contributes to the overall flavor and consistency.
Ingredients List
- 12 tablespoons unsalted butter, melted
- 5 tablespoons unsweetened cocoa powder
- ½ teaspoon table salt
- 1¼ cups granulated sugar
- 3 large eggs
- ¾ teaspoon vanilla extract
- ¾ teaspoon white vinegar
- 1 cup all-purpose flour
- 10–12 drops Wilton red food coloring
- 1 cup white chocolate chips, divided
Step-by-Step Directions
- Preheat: Set your oven to 350°F (175°C). Prepare a 9×9-inch pan with parchment paper and a light coat of nonstick cooking spray.
- Combine Wet Ingredients: In a large bowl, whisk together the melted butter, cocoa powder, salt, and sugar until the mixture is smooth and well blended.
- Incorporate Eggs and Flavor: Add eggs, vanilla extract, and vinegar. Mix until the batter is consistently smooth.
- Fold in Dry Ingredients: Gently fold in the flour. Before fully mixing, add about 7 drops of red food coloring. Continue stirring while adding drops slowly until you achieve your desired red intensity.
- Add Chocolate Chips: Fold in half of the white chocolate chips, reserving the other half for the topping.
- Bake: Pour the batter into your prepared pan and evenly smooth the top. Sprinkle the remaining chips over the surface. Bake for 22–25 minutes, checking doneness with a toothpick inserted in the center—the results should be moist with a few crumbs.
- Cool and Serve: Allow the red velvet brownies to cool in the pan for at least one hour. Cut into squares and serve.
Serving Suggestions
Red velvet brownies are visually stunning and packed with flavor, making them ideal for a wide range of occasions. Here are a few creative and practical ways to serve them:
- Neatly Sliced Squares: Cut into even squares using a serrated knife for clean edges. This makes them easy to display on dessert platters.
- Chilled or Room Temperature: These brownies taste excellent both freshly baked and chilled. Refrigeration can give them a denser texture, similar to fudge.
- Topped with Whipped Cream or Frosting: Add a dollop of whipped cream or a swirl of cream cheese frosting for extra indulgence.
- Paired with a Hot Beverage: Serve with coffee, hot cocoa, or tea to balance the richness.
- Gift-Wrapped for Holidays: Individually wrap slices in parchment and ribbon for a thoughtful gift during Valentine’s Day, Christmas, or birthdays.
If you want to elevate presentation for a formal event, consider stacking the brownie squares in tiers on a cake stand or arranging them in a spiral pattern on a serving tray.
Common Mistakes to Avoid
Even simple recipes can go off track. Avoid these common mistakes to ensure your red velvet brownies come out perfect every time:
- Overmixing the Batter: Mixing too long after adding flour develops gluten, making the texture tough rather than soft and fudgy.
- Overbaking: These brownies should be slightly underbaked in the center when removed from the oven. They will continue to set as they cool.
- Adding Too Much Food Coloring: Using too many drops can leave a bitter aftertaste. Start with less and build gradually to reach your ideal shade.
- Using Subpar Chocolate or Cocoa: Low-quality cocoa can affect both taste and color. Use a good-quality unsweetened cocoa powder for the best results.
- Skipping the Vinegar: Though it might seem minor, vinegar enhances the chemical reaction with cocoa powder to give red velvet its signature color and tender crumb.
- Neglecting to Line the Pan: Parchment paper prevents sticking and makes removing the brownies easier.
- Not Cooling Before Cutting: Cutting while hot can cause them to fall apart. Let them cool for at least one hour for clean slicing.
Paying attention to these potential pitfalls can drastically improve both the texture and appearance of your brownies.
How to Perfect the Recipe
Refining small details can take your brownies from good to unforgettable. Here are a few expert tips:
- Use Room Temperature Eggs: This helps them incorporate more evenly, improving texture.
- Don’t Rush the Color: Gel-based food coloring often provides a more vibrant hue with less liquid, preventing a runny batter.
- Add Espresso Powder: A small amount of instant espresso powder intensifies the cocoa flavor without making the brownies taste like coffee.
- Test Early for Doneness: Begin checking at 20 minutes to prevent overbaking. A few moist crumbs on the toothpick is a good sign.
- Use a Metal Pan: Glass pans retain heat and can cause overbaking. A light-colored metal pan distributes heat more evenly.
- Cool in the Pan: Leave the brownies in the pan to cool, allowing residual heat to finish the cooking process evenly.
These practices help maintain a dense, moist interior while giving your brownies the rich red velvet appearance people expect.
Side Dish Recommendations
While red velvet brownies are often enjoyed alone, pairing them with complementary sides can enhance the experience. Here are eight thoughtful options:
- Vanilla Bean Ice Cream
A classic match. The cold creaminess of vanilla ice cream balances the warm richness of the brownie. - Fresh Strawberries or Raspberries
Their tartness brightens the dessert and adds a refreshing note. - Whipped Cream with a Touch of Cinnamon
Light and airy, whipped cream adds elegance without overwhelming the flavor. - Salted Caramel Drizzle
The saltiness cuts through the sweetness while deepening the overall flavor. - Cream Cheese Frosting
A nod to the traditional red velvet cake. A small swipe on top makes the brownies feel more indulgent. - Dark Chocolate Ganache
Adds an extra layer of richness and a sophisticated finish. - Coconut Milk Latte
A non-dairy drink pairing that complements the cocoa notes and is ideal for lactose-sensitive guests. - Chopped Nuts or Toasted Coconut on the Side
Serve a small bowl alongside the brownies so guests can sprinkle their favorite texture-enhancing topping.
Recipe Tips and Expert Advice
Perfecting your red velvet brownies doesn’t take much extra effort, but it does require attention to detail. Here are some expert insights to ensure the best results every time:
- Use High-Quality Ingredients: The quality of your cocoa powder and butter significantly affects flavor. Choose unsweetened cocoa powder from a reputable brand for deeper cocoa notes.
- Gradual Food Coloring Application: Food coloring can be overpowering. Add a few drops at a time, stir, and assess the hue before adding more.
- Test Your Oven Temperature: Not all ovens bake evenly. Use an oven thermometer to ensure accurate baking, especially when aiming for fudgy rather than cakey brownies.
- Add Mix-Ins with Intention: Fold in white chocolate chips gently to avoid breaking them and ensure even distribution. You can also try other additions like chopped pecans or a swirl of cream cheese for added variety.
- Allow Proper Cooling Time: These brownies firm up as they cool. Cutting into them too early will cause them to fall apart or lose their structure.
- Double the Batch for Larger Groups: This recipe can be easily doubled and baked in a 9×13-inch pan. Add a few extra minutes to the baking time and check for doneness starting at 28 minutes.
For more baking success tips, check out trusted sources like King Arthur Baking or internal guides on brownie techniques.
Storage and Reheating Instructions
Red velvet brownies store well and can even improve in flavor over a day or two. Here are the best practices for storing and reheating:
- Room Temperature: Store leftovers in an airtight container for up to 4 days. Place parchment paper between layers if stacking.
- Refrigeration: For a firmer texture and extended shelf life, store the brownies in the fridge. They will stay fresh for up to 1 week. Let them sit at room temperature for 15–20 minutes before serving to regain softness.
- Freezing: These brownies freeze beautifully. Wrap each piece tightly in plastic wrap, then place in a freezer-safe container or zip-top bag. They will keep for up to 2 months. Thaw at room temperature or warm gently in the microwave.
- Reheating: To enjoy warm, microwave an individual brownie for 10–15 seconds. Avoid overheating, as it can make them rubbery.
These methods ensure your brownies maintain both flavor and texture over time.
Frequently Asked Questions
What makes red velvet brownies different from regular brownies?
Red velvet brownies are lighter in cocoa flavor and include red food coloring and a bit of vinegar, which reacts with the cocoa to enhance both color and texture. They often include white chocolate chips and mimic the flavor profile of red velvet cake in brownie form.
Can I make red velvet brownies without food coloring?
Yes. The food coloring is for visual appeal and does not affect taste. If you prefer natural coloring, you can use beet powder or omit the coloring entirely. The brownies will still have the signature soft texture and subtle cocoa flavor.
What does the vinegar do in this recipe?
The vinegar enhances the chemical reaction with cocoa powder and baking soda (if used), contributing to the classic red velvet texture and giving the batter a slight tang, which balances the sweetness.
How do I know when my brownies are done?
Use a toothpick inserted in the center. If it comes out with a few moist crumbs, they are ready. The surface should be set, and the edges will slightly pull away from the pan. Overbaking will result in a dry texture.
Can I use a different type of chocolate chip?
Absolutely. While white chocolate chips complement the mild cocoa flavor of red velvet, dark, milk, or even flavored chips like butterscotch can be used. Keep the quantity the same for best texture.
Are these brownies gluten-free?
Not by default. However, you can substitute a gluten-free all-purpose flour blend in a 1:1 ratio. Ensure the blend includes xanthan gum or another binder for best results.
Can I substitute oil for butter?
Using oil instead of butter will create a denser, chewier texture and reduce the rich flavor butter provides. It’s possible but not recommended if you want the same depth of flavor.
Do these need to be stored in the refrigerator?
Not necessarily. They stay fresh at room temperature for several days. However, if your kitchen is particularly warm, refrigeration is a good option to prevent spoilage.
Can I double the recipe?
Yes, and it’s a great option for events or parties. Use a 9×13-inch pan and adjust baking time accordingly. Begin checking at 28 minutes to avoid overbaking.
Why are my brownies too dry or crumbly?
This typically happens from overbaking or using too much flour. Measure flour carefully by spooning it into the measuring cup and leveling it with a knife.
Conclusion
Red velvet brownies bring together everything you want in a dessert: bold color, soft texture, and rich flavor. Their simplicity and visual appeal make them ideal for any occasion, from casual gatherings to holiday celebrations. With thoughtful preparation and the right techniques, you can create bakery-quality brownies at home that everyone will remember.
Looking for more brownie recipes or chocolate-based treats? Explore our full dessert collection on the Desserts section of our site.
Red Velvet Brownies
Ingredients
- 12 tablespoons unsalted butter melted
- 5 tablespoons unsweetened cocoa powder
- ½ teaspoon table salt
- 1¼ cups granulated sugar
- 3 eggs
- ¾ teaspoon vanilla extract
- ¾ teaspoon white vinegar
- 1 cup all-purpose flour
- 10 –12 drops Wilton red food coloring adjust to desired color
- 1 cup white chocolate chips divided
Instructions
- Preheat the oven to 350°F (175°C). Line a 9×9-inch baking pan with parchment paper and spray with nonstick cooking spray.
- In a large bowl, whisk together the melted butter, cocoa powder, salt, and sugar until fully combined.
- Add the eggs, vanilla extract, and vinegar. Mix until smooth.
- Gently fold in the flour. Before it’s fully incorporated, add 7 drops of red food coloring. Continue adding drops and stirring until the desired red hue is achieved.
- Fold in ½ cup of the white chocolate chips.
- Pour the batter into the prepared pan and smooth the top. Sprinkle the remaining ½ cup of white chocolate chips evenly over the surface.
- Bake for 22–25 minutes, or until a toothpick inserted into the center comes out with a few moist crumbs.
- Allow the brownies to cool in the pan for at least 1 hour before slicing into squares and serving.
Leave a Comment