This easy sourdough discard sandwich bread recipe combines leftover starter with commercial yeast to create a soft, tender loaf. It is perfect for everyday sandwiches, toast, or enjoying with butter and jam. The process is beginner-friendly, requiring minimal ingredients and effort while delivering bakery-quality results.
Why You’ll Love This Recipe
- Great use for sourdough discard – No waste, just delicious bread.
- Soft and tender texture – Ideal for sandwiches or toast.
- Beginner-friendly – Uses commercial yeast for a reliable rise.
- Customizable – Adjust the sweetness, flour type, or add-ins.
Essential Tools & Equipment
- Mixing bowls – For combining ingredients.
- Stand mixer (optional) – Speeds up kneading.
- Dough scraper – Helps handle the dough easily.
- Loaf pan (9×5 inch) – Shapes the bread properly.
- Kitchen scale – Ensures precise measurements.
- Thermometer – Confirms doneness at 200°F (94°C).
Ingredients
| Ingredient | Amount |
|---|---|
| Lukewarm water | 120g (½ cup) |
| Lukewarm milk | 120g (½ cup) |
| Instant yeast (or active dry yeast) | 7g (2 ½ tsp) |
| Granulated white sugar | 25g (2 tbsp) |
| Bread flour (or strong all-purpose flour) | 406g (3 ¼ cups) |
| Sourdough discard | 100g (approx. ½ cup) |
| Salt | 8g (1 ½ tsp) |
| Butter (room temperature) | 45g (3 tbsp) |
Step-by-Step Directions
1. Mixing & First Rise
- In a large bowl, mix lukewarm water, milk, sugar, and yeast. If using active dry yeast, let it sit for 5–10 minutes until foamy.
- Add flour, sourdough discard, and salt. Mix until a shaggy dough forms.
- Add the softened butter and knead by hand or use a stand mixer until fully incorporated.
- Knead for 8–10 minutes until smooth and elastic.
- Place in a greased bowl, cover, and let rise 1–1.5 hours until doubled in size. (Optional: Cold-proof overnight for better flavor.)
2. Shaping & Second Rise
- Punch down the dough and place it on a lightly floured surface.
- Flatten into a rectangle, then fold and roll it into a loaf shape.
- Place seam-side down in a lined loaf pan.
- Cover and let it rise until 1 inch above the rim, about 45–60 minutes.
3. Baking
- Preheat oven to 350°F (180°C).
- Bake for 35 minutes, covering with foil after 20 minutes if browning too quickly.
- The loaf is done when it reaches 200°F (94°C) internally.
- Cool completely before slicing.
Serving Suggestions
This sourdough discard sandwich bread is versatile and works well in a variety of meals. Here are some of the best ways to enjoy it:
- Classic Sandwiches – Use it for turkey, ham, chicken, or grilled cheese sandwiches. The soft yet sturdy texture makes it an excellent sandwich bread.
- Toast with Butter and Jam – Spread with butter, jam, honey, or peanut butter for a simple and satisfying breakfast or snack.
- French Toast – The slightly tangy flavor from the sourdough discard adds depth to classic French toast.
- Garlic Bread – Slice, spread with butter and minced garlic, then toast or broil for a quick and flavorful side dish.
- Croutons – Cube the bread, toss with olive oil and seasoning, and bake until crispy to use in salads or soups.
- Bread Pudding – Its soft texture makes it an excellent choice for sweet or savory bread pudding recipes.
Common Mistakes to Avoid
While this recipe is beginner-friendly, a few common mistakes can affect the outcome.
Overproofing the Dough
Letting the dough rise too much during the second proof can lead to a collapsed loaf. The dough should rise just until it reaches about one inch above the rim of the loaf pan. If it rises too much, the gluten structure weakens, causing the bread to deflate during baking.
Under-Kneading the Dough
If the dough is not kneaded enough, the gluten structure will be weak, resulting in a dense loaf. Knead by hand for at least 8–10 minutes or use a stand mixer on low speed for about 5–6 minutes until the dough is smooth and elastic.
Cutting the Bread Too Soon
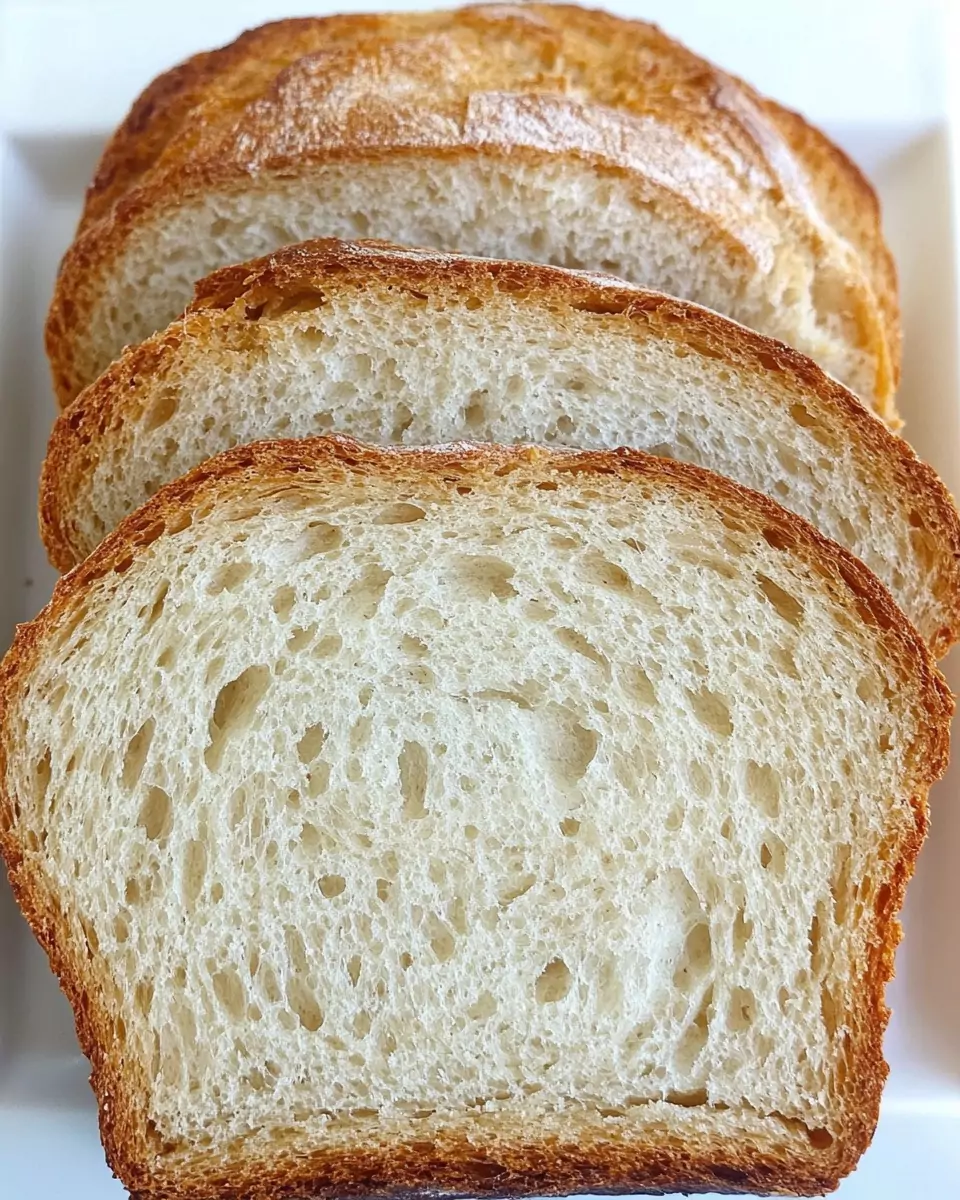
Slicing into warm bread may seem tempting, but it can ruin the texture. As the bread cools, the crumb continues to set, creating a soft yet structured interior. Cutting too early releases steam, making the bread gummy instead of light and airy. Always wait until the loaf is completely cool before slicing.
Using Too Much or Too Little Flour
Measuring flour incorrectly can lead to a dense or overly dry loaf. It is best to use a kitchen scale for accuracy. If using measuring cups, lightly spoon the flour into the cup and level it off rather than scooping directly from the bag, which can pack in too much flour.
Baking at the Wrong Temperature
An oven that runs too hot can cause the crust to harden too quickly before the inside is fully baked, while an oven that is too cool may result in an underbaked loaf. It is best to use an oven thermometer to ensure an accurate baking temperature of 350°F (180°C).
Side Dish Recommendations
This sourdough discard sandwich bread pairs well with a variety of side dishes, whether served as part of a meal or as an accompaniment to soups and salads.
- Tomato Soup – A classic pairing with grilled cheese sandwiches. The tanginess of the sourdough complements the rich, creamy texture of the soup.
- Scrambled Eggs – Serve with scrambled eggs and avocado for a hearty breakfast. Toasted slices of this bread provide the perfect base for a breakfast sandwich.
- Avocado Spread – Mashed avocado with salt, pepper, and a squeeze of lemon makes a simple yet flavorful topping for toast.
- Crispy Bacon – A side of crispy bacon adds a savory and smoky contrast to the slightly tangy bread.
- Honey and Butter – For a touch of sweetness, drizzle honey over a buttered slice. This is an excellent choice for a quick and satisfying snack.
- Salad with Balsamic Dressing – The light acidity of a balsamic vinaigrette pairs well with the mild tang of the bread, making it a great accompaniment to fresh greens.
- Chili or Stew – Use this bread to soak up the rich and hearty flavors of chili, beef stew, or lentil soup.
- Homemade Jam – Whether strawberry, blueberry, or apricot, homemade jam pairs beautifully with the slight tanginess of this bread.
Storage and Reheating Instructions
Proper storage ensures the bread stays fresh and maintains its soft texture. Follow these guidelines to keep it at its best for as long as possible.
Storing at Room Temperature
- Keep the bread in an airtight container or wrap it tightly in plastic wrap.
- Store it in a cool, dry place for up to 4–5 days.
- Avoid storing it in the refrigerator, as this can dry out the bread.
Freezing Instructions
- To freeze the entire loaf, wrap it tightly in plastic wrap and then in aluminum foil or place it in a freezer-safe bag.
- For easier use, slice the bread before freezing and place parchment paper between slices to prevent sticking.
- Freeze for up to 3 months.
Reheating Instructions
- For individual slices, toast in a toaster or warm in a dry skillet over medium heat.
- To refresh a whole loaf, place it in a 300°F (150°C) oven for about 10–15 minutes until warmed through.
- If reheating frozen slices, allow them to thaw at room temperature for a few minutes before toasting.
Frequently Asked Questions
Can I use all-purpose flour instead of bread flour?
Yes, but the texture will be slightly different. Bread flour has a higher protein content, which gives the bread more structure and chewiness. If using all-purpose flour, the loaf may be a bit softer.
Why is my bread dense?
A dense loaf can result from under-kneading, not allowing enough rise time, or using too much flour. Ensure the dough is kneaded until smooth and elastic, and allow it to rise properly before baking.
Can I make this without yeast?
No, this recipe relies on commercial yeast for structure. If you want to make a fully sourdough version without added yeast, the fermentation process will take longer, typically requiring an overnight bulk rise.
How do I know when the dough has risen enough?
A simple test is to gently press the dough with your fingertip. If it springs back slowly and leaves a slight indentation, it is ready to bake. If it springs back too quickly, it needs more time to rise.
Can I add whole wheat flour?
Yes, but it will make the bread denser. For the best balance of softness and nutrition, replace 25–30% of the bread flour with whole wheat flour. You may need to add a bit more liquid since whole wheat flour absorbs more moisture.
Why does my bread taste sour?
The level of sourness depends on the age and strength of your sourdough discard. If the discard is older and more fermented, it will produce a tangier loaf. For a milder flavor, use discard that has been recently fed.
Can I let the dough rise overnight?
Yes, an overnight cold-proof in the refrigerator enhances the flavor and texture of the bread. After mixing and kneading, cover the dough and refrigerate overnight. Let it come to room temperature before shaping and baking.
How do I prevent my bread from drying out?
Store it properly in an airtight container and avoid refrigerating it. If the bread becomes dry, reheat it in the oven wrapped in a damp towel at 300°F (150°C) for about 10 minutes.
Conclusion
This sourdough discard sandwich bread is an excellent way to repurpose extra sourdough starter while making a soft, flavorful loaf. It is simple to prepare and works well for sandwiches, toast, and various other meals. The combination of sourdough discard and yeast ensures a reliable rise and a perfect texture, making this a great option for both beginners and experienced bakers.
With proper storage and a few simple techniques, you can enjoy fresh, homemade bread for days. Whether served alongside soups, used in sandwiches, or simply enjoyed with butter and jam, this bread is a versatile and delicious staple for any kitchen.

Sourdough Discard Sandwich Bread
Ingredients
- 120 g ½ cup lukewarm water
- 120 g ½ cup lukewarm milk
- 7 g 2 ½ tsp instant yeast (or active dry yeast*)
- 25 g 2 tbsp granulated white sugar
- 406 g 3 ¼ cups* bread flour or strong all-purpose flour
- 100 g approx. ½ cup sourdough discard
- 8 g 1 ½ tsp salt
- 45 g 3 tbsp room-temperature butter
Instructions
Mixing & First Rise
- In a large bowl, combine lukewarm water, milk, sugar, and yeast. If using active dry yeast, let sit for 5-10 minutes until foamy; if using instant yeast, proceed immediately.
- Add the flour, sourdough discard, and salt. Mix with a fork or wooden spoon until a shaggy dough forms.
- Add the softened butter and knead it into the dough by hand until fully combined.
- Transfer the dough to a lightly floured surface and knead for 8-10 minutes until soft, smooth, and elastic. Alternatively, use a stand mixer with a dough hook.
- Place the dough in a lightly greased bowl, cover with a damp towel, and let rise in a warm place for 1 to 1 ½ hours, until doubled in size.
- Optional cold-proof: Refrigerate overnight for enhanced flavor and texture.
Shaping & Second Rise
- Punch down the dough and turn it onto a lightly floured surface. Line a 9×5-inch loaf pan with parchment paper.
- Flatten the dough into a rectangle slightly shorter than the length of the loaf pan. Orient it so the long sides are left and right.
- Fold the top third of the dough toward the center and press along the fold to seal. Repeat this folding and sealing process two more times.
- Place the shaped dough seam-side down in the lined loaf pan. Cover loosely with a kitchen towel or plastic wrap and let rise until it doubles in size and rises about 1 inch (2.5 cm) above the pan’s rim.
- Be careful not to overproof, especially in a warm environment.
Baking
- Preheat the oven to 350°F (180°C) while the dough rises.
- Bake for about 35 minutes, until deep golden brown. If the top browns too quickly, tent loosely with foil after 20 minutes.
- The bread is done when it sounds hollow when tapped and reaches an internal temperature of 200°F (94°C).
- Remove from the pan and cool completely before slicing.
Storing
- Store at room temperature in an airtight container for 4-5 days.
- Freeze for up to 3 months.
Notes
US cup measurements are approximate and may lead to inconsistencies due to packing differences.


Leave a Comment