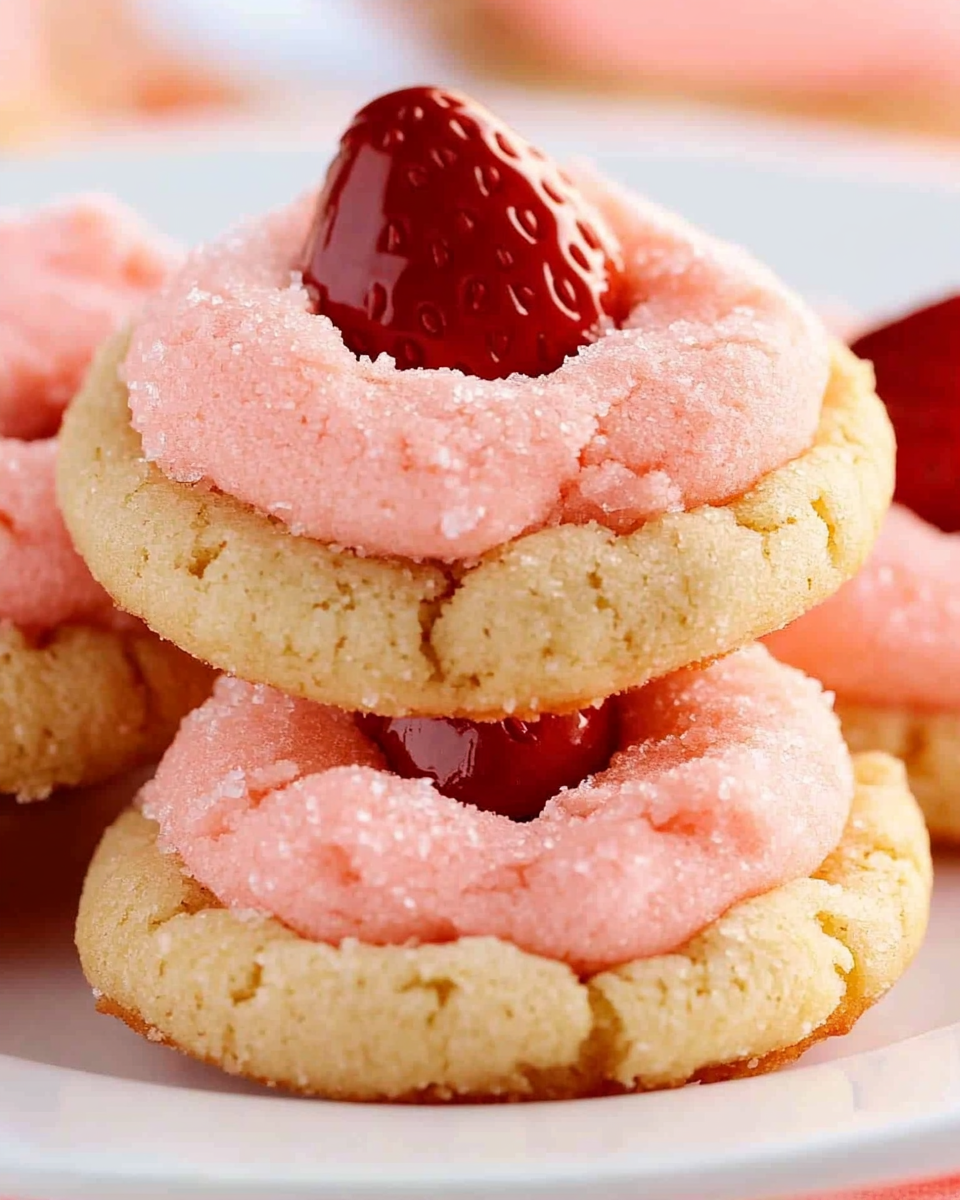
Strawberry Kiss Cookies are the ultimate combination of soft, chewy texture and vibrant strawberry flavor, all topped with the classic charm of a Hershey’s Kiss. These cookies are a creative twist on the traditional blossom cookie, made easier and faster with the help of a strawberry cake mix. Their eye-catching pink color and sugar-coated sparkle make them perfect for Valentine’s Day, baby showers, birthdays, or whenever you need a festive treat.
These cookies are more than just beautiful—they’re loaded with flavor. The subtle tartness of strawberries pairs perfectly with the smooth, creamy taste of chocolate. Whether you’re making them for loved ones or keeping them all to yourself, Strawberry Kiss Cookies deliver a flavor-packed experience in every bite.
Why You’ll Love This Recipe
- Quick prep with only a few ingredients
- Vibrant and fun for special occasions
- Soft, chewy texture that stays fresh
- Flexible flavor—customize with your favorite Kisses
- Kid-friendly and freezer-friendly
These cookies are great for beginner bakers or anyone short on time who still wants to impress. The shortcut of using a cake mix streamlines the process, while rolling the cookies in granulated sugar before baking gives them a subtle crunch and beautiful sparkle.
Preparation Phase and Tools to Use
Before you start baking, it’s important to gather your tools and prep your space. Doing this makes the process smoother and ensures consistent results.
Essential Tools and Equipment
- Large mixing bowl
- Electric hand mixer or whisk
- #30 cookie scoop (about 2 tablespoons)
- Two baking sheets
- Parchment paper
- Cooling rack
- Measuring spoons
- Rubber spatula
Importance of Each Tool
- A large mixing bowl allows space to combine ingredients without spillage.
- A cookie scoop helps ensure uniform size, which promotes even baking.
- Parchment paper prevents sticking and makes cleanup easier.
- A cooling rack helps the cookies cool evenly, avoiding soggy bottoms.
These tools not only make the process easier but also improve the quality of your final product.
Preparation Tips
- Use room-temperature eggs for smoother mixing.
- Chill the dough to help the cookies retain their shape and prevent spreading.
- Unwrap all Hershey’s Kisses before baking to ensure they’re ready to press into the warm cookies.
- Preheat your oven after chilling the dough to maximize oven accuracy.
Proper preparation sets the tone for baking success. Taking just a few minutes to organize your kitchen and gather your tools ensures that everything runs smoothly.
Ingredients List
To make these Strawberry Kiss Cookies, you’ll need just a handful of pantry staples and one specialty ingredient:
- 1 box strawberry cake mix
- 2 tablespoons all-purpose flour
- ¼ cup vegetable oil
- 2 large eggs
- 1 tablespoon milk
- Granulated sugar (for rolling)
- Hershey’s Kisses, unwrapped
Optional Add-ins:
- Freeze-dried strawberries, crushed (for a more intense strawberry flavor)
- White chocolate chips or sprinkles
- Pink or red sugar for rolling
These ingredients come together quickly, making this an ideal recipe when you need a dessert that feels homemade without the extra effort.
Step-by-Step Directions
Follow these simple steps to create perfectly soft and chewy Strawberry Kiss Cookies:
- In a large mixing bowl, whisk together the vegetable oil and eggs until well combined.
- Gradually add in the flour and strawberry cake mix, stirring until just incorporated.
- Add the milk and mix until a soft dough forms. Do not overmix.
- Using a cookie scoop or two tablespoons of dough, shape the dough into balls.
- Roll each ball in granulated sugar until evenly coated.
- Place the dough balls on a tray, cover, and chill in the refrigerator for at least one hour.
- Preheat the oven to 375ºF. Line two cookie sheets with parchment paper.
- Arrange chilled dough balls on the prepared cookie sheets, spacing them about 2 inches apart.
- Bake one sheet at a time for 8–10 minutes, or until the edges are set but the centers are still soft.
- Immediately after removing the cookies from the oven, gently press a Hershey’s Kiss into the center of each cookie.
- Let the cookies cool on the sheet for 5 minutes, then transfer to a wire rack to cool completely.
Variation Tips
- Use dark chocolate or white chocolate Kisses to create flavor contrast.
- For festive cookies, roll dough balls in colored sanding sugar before baking.
- Add ½ teaspoon of strawberry extract for enhanced fruitiness.
Chilling the dough is key to the cookies’ texture. It prevents spreading and results in thick, soft centers that pair perfectly with the creamy chocolate on top.
Common Mistakes to Avoid
Baking cookies with cake mix may seem foolproof, but a few common mistakes can impact the final result. Here’s what to avoid and how to get the best outcome.
Mistake 1: Not Chilling the Dough
Skipping the chilling step can lead to cookies that spread too thin. The dough is soft and sticky when first mixed, and chilling it helps the fat solidify, resulting in thicker, chewier cookies with clean edges.
Solution: Chill the dough for at least one hour. If you have extra time, chill for two hours for maximum thickness.
Mistake 2: Overbaking
Because the cookies are meant to be soft and chewy, it’s important not to overbake. They should be slightly underbaked in the center when removed from the oven; residual heat will finish the process.
Solution: Bake for 8 to 10 minutes and watch closely. The edges should be set, but the centers should still look a bit soft.
Mistake 3: Delaying the Hershey’s Kiss
The cookies need to be warm when the Hershey’s Kiss is pressed into the center. Waiting too long allows the cookie top to firm up, making it harder to insert the chocolate.
Solution: Have the Kisses unwrapped and ready before the cookies come out of the oven. Press them in immediately while the cookies are still soft.
Mistake 4: Using Expired Cake Mix
Older cake mix can affect the leavening and flavor of the cookie. It may result in a denser, off-tasting cookie.
Solution: Always check the expiration date and store your cake mix in a cool, dry place. Use fresh ingredients for the best flavor.
Mistake 5: Overmixing the Dough
While it’s tempting to keep mixing until smooth, overmixing activates the gluten in the flour, which can lead to tougher cookies.
Solution: Stir just until the ingredients are combined. The dough doesn’t need to be perfectly smooth.
Mistake 6: Adding Too Much Liquid
Adding more milk or oil than necessary can make the dough too soft, which results in greasy or overly spread cookies.
Solution: Stick to the measured amounts in the recipe. The dough should be soft but firm enough to shape into balls.
Side Dish and Drink Pairings
While cookies typically shine on their own, pairing them with the right side dishes or drinks can enhance the experience. Here are eight delicious suggestions to serve alongside Strawberry Kiss Cookies.
- Vanilla Bean Ice Cream
The rich, creamy flavor of vanilla contrasts beautifully with the fruity cookie. - Whipped Strawberry Mousse
Keeps the strawberry theme going and adds a light, airy texture to the dessert course. - Fresh Berry Salad
A refreshing, tart side to balance the sweetness of the cookies. - Hot Chocolate with Marshmallows
A warm drink that complements the chocolate kiss in the center of each cookie. - Raspberry Lemonade
Light, citrusy, and fruity—pairs well during warm months or outdoor events. - White Chocolate Bark
Add a richer, more decadent note to the dessert spread. - Sparkling Rosé or Moscato
A great adult pairing for romantic dinners or parties. - Mini Cheesecake Bites
Creamy, rich, and slightly tangy, these create an elevated dessert combo with the cookies.
Each of these pairing ideas can elevate your cookie presentation and add variety to your dessert offerings, whether you’re hosting a party or just treating yourself.
Expert Baking Tips
- Don’t skip the chilling time: This is crucial for shape and texture. Chilled dough bakes more evenly and retains its thickness.
- Use parchment or silicone mats: They prevent over-browning and promote even heat distribution.
- Uniform sizing: A cookie scoop ensures consistent size, which results in even baking and a more professional look.
- Gently press the Kisses: Press just until the base of the Kiss is flush with the cookie surface. Avoid pressing too deeply or the cookie may crack.
- Let the cookies set: Don’t move them immediately after baking. Give them a few minutes to cool and firm up on the baking sheet before transferring to a wire rack.
These small steps can make a big impact on the final product, especially when appearance and texture matter.
Storage Instructions
Strawberry Kiss Cookies store well and retain their flavor and softness for several days if kept properly.
Room Temperature
- Store cookies in an airtight container at room temperature for up to 5 days.
- Separate layers with parchment or wax paper to prevent the chocolate Kisses from smudging.
- Keep away from heat sources or direct sunlight to prevent the Kisses from melting.
Freezing
- To freeze baked cookies: Place them in a single layer on a baking sheet and freeze until solid. Then transfer to an airtight freezer-safe container or bag. They can be stored for up to 2 months.
- To freeze the dough: Shape into balls, roll in sugar, and freeze on a baking sheet. Once frozen, transfer to a container. Bake directly from frozen, adding 1–2 minutes to the baking time.
Reheating
If you prefer your cookies warm, reheat gently:
- Microwave a cookie for 5–8 seconds. This softens the texture and slightly melts the chocolate center.
- Avoid overheating, as the chocolate Kiss can melt too much and lose shape.
Proper storage helps preserve texture and flavor while allowing you to enjoy these cookies over time or prepare ahead for special occasions.
Frequently Asked Questions (FAQs)
Here are answers to some of the most common questions about Strawberry Kiss Cookies, based on real user queries and search trends.
Can I use a homemade strawberry cookie dough instead of cake mix?
Yes, you can use a homemade strawberry cookie base, but the convenience of cake mix is part of what makes this recipe so appealing. If using a homemade dough, ensure the consistency is similar—soft but not too sticky.
How do I keep the Hershey’s Kisses from melting?
Kisses will soften slightly when pressed into warm cookies but should retain their shape if not exposed to excess heat. Do not return the cookies to the oven after adding the Kisses. Allow them to cool completely at room temperature.
What other cake mix flavors can I use?
You can easily swap the strawberry cake mix for other flavors like:
- Red velvet
- Chocolate
- Funfetti
- Lemon
Each variation pairs well with different types of Hershey’s Kisses.
Can I make this recipe gluten-free?
Yes. Use a gluten-free strawberry cake mix and a gluten-free flour substitute for the all-purpose flour. Make sure to check that the chocolate Kisses are certified gluten-free as well.
Why did my cookies spread too much?
The most common reasons are:
- Not chilling the dough long enough
- Too much liquid (e.g., extra milk or oil)
- Baking on a warm sheet from a previous batch
Can I make these cookies ahead of time?
Yes. You can:
- Prepare the dough and chill for up to 48 hours before baking
- Freeze the dough balls for up to 2 months
- Bake the cookies and store them at room temperature for several days
Can I use mini Kisses or other filled Kisses?
Absolutely. Mini Kisses or specialty filled Kisses like caramel, lava cake, or almond can be used. Just keep in mind that some filled varieties may melt faster, so handle gently after baking.
Conclusion and Final Thoughts
Strawberry Kiss Cookies are a sweet, colorful, and flavorful way to bring joy to your dessert table. Their soft texture, fruity base, and rich chocolate center make them a crowd-pleasing treat for any occasion.
This recipe’s simplicity, thanks to cake mix, makes it accessible to bakers of all skill levels. With just a few ingredients and some chilling time, you can create bakery-quality cookies at home. The versatility of the recipe allows for countless variations, from different cake mix flavors to a variety of Hershey’s Kisses.
Whether you’re baking for a holiday, hosting a cookie exchange, or just craving a chewy strawberry cookie with a chocolate twist, these cookies are a must-try. For more easy desserts like this, explore our Easy Red Velvet Cookies or Chocolate Crinkle Cookies to expand your collection of quick and festive bakes.
Let us know how your batch turns out and tag us on social media with your creations. Happy baking.

Strawberry Kiss Cookies
Ingredients
- 1 box strawberry cake mix
- 2 tablespoons all-purpose flour
- ¼ cup vegetable oil
- 2 eggs
- 1 tablespoon milk
- Granulated sugar for rolling
- Hershey Kisses unwrapped
Instructions
Make the Dough:
- In a large bowl, mix together the vegetable oil and eggs until well combined. Gradually add in the flour and strawberry cake mix. Stir in the milk and mix just until a dough forms.
Shape and Chill:
- Using a #30 cookie scoop or about 2 tablespoons per cookie, scoop the dough into balls. Roll each ball in granulated sugar. Cover and chill the dough in the refrigerator for at least 1 hour.
Bake:
- Preheat oven to 375ºF. Line two cookie sheets with parchment paper. Bake cookies one sheet at a time for 8–10 minutes. Keep the remaining dough chilled between batches.
Add the Kisses:
- Immediately after baking, gently press a Hershey Kiss into the center of each warm cookie. Allow the cookies to cool completely before transferring or storing.
Leave a Comment