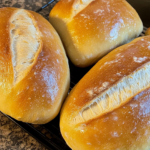
Soft Sourdough Sandwich Bread
This soft sourdough sandwich bread has a light, fluffy texture and a tender crust, making it ideal for sandwiches, toast, or even French toast. It’s a no-fuss recipe with no stretching or folding required, and it fits easily into your schedule thanks to its flexible 24-hour process — with only about 10 minutes of hands-on work!
Servings: 4 loaves
Calories: 150kcal
Ingredients
For the Pre-ferment:
- 2 cups active sourdough starter
- 2 cups water milk, or buttermilk (warm if your house is cool)
- 3 cups all-purpose or bread flour
For the Dough:
- 1/4 cup fat butter, oil, melted coconut oil, or beef tallow; warm if the house is cool
- 1/2 cup sweetener honey or sugar
- 4 teaspoons salt
- 3 cups milk or buttermilk any kind; warm if the house is cool
- 9 –11 cups all-purpose or bread flour
Instructions
Feed Sourdough Starter
- Feed your sourdough starter with no more than 1/2 cup starter, 2 cups flour, and about 1 1/3 cups warm water.
- Let it sit at room temperature until active and bubbly, then proceed.
Combine Pre-ferment Ingredients
- In the bowl of a stand mixer, combine 2 cups milk or buttermilk, 2 cups active sourdough starter, and 3 cups flour.
- Mix on low speed for 1 minute using the dough hook.
- Cover and let ferment at room temperature overnight.
Mix the Dough
- The next morning, add the fat, sweetener, salt, and 3 cups milk or buttermilk to the pre-ferment.
- Mix on low speed until roughly combined.
- Add 5 cups of flour and mix on medium speed for 5–10 minutes to build gluten.
- Gradually add 4–6 more cups of flour, until the dough pulls away from the sides of the bowl and feels slightly sticky.
- Continue mixing for 2–3 minutes more.
First Rise
- Transfer dough to a large oiled bowl. Cover with a towel or plastic wrap and let rise in a warm spot for 2–3 hours, until doubled. In cooler temperatures, this may take longer.
Shape the Loaves
- Punch down the risen dough and transfer to a lightly floured surface.
- Divide into 4 equal portions.
- Flatten each into a rectangle, fold the corners in to form a triangle, and roll into a loaf shape, tucking the edges under.
- Place each loaf into a greased loaf pan.
Second Rise
- Cover loaves and allow to rise until just above the edges of the pans, about 2–3 hours. Monitor closely to avoid over-proofing.
Bake
- Preheat oven to 375°F (190°C).
- Use a bread lame or sharp blade to slash the tops of the loaves.
- Bake for about 30 minutes, or until the internal temperature reaches 190°F (88°C).
Cool and Store
- Remove loaves from pans and cool on a wire rack.
- Brush tops with butter to keep the crust soft.
- Allow loaves to cool completely before slicing.
- Store at room temperature for up to 1 week in a plastic bag, or freeze (pre-sliced if desired) for up to 3 months.
Notes
Flexible Timing: You can feed your starter in the morning, prepare the pre-ferment in the evening, and bake the next day — making it easy to fit into your schedule.
Temperature Tips: In cooler weather, use warm liquids and allow extra time for rising.
In warm weather, monitor the dough to prevent over-proofing.
Versatile Use: This bread works well for sandwiches, toast, French toast, and more.
